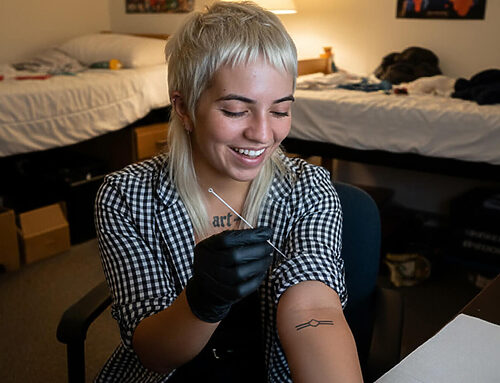
If you’re ready to give yourself a stick and poke tattoo, those handmade designs created one dot at a time on your own skin, you’re embarking on a personal and rewarding DIY project. No tattoo shop needed: just you, your body as canvas, and careful planning. These tattoos have gained popularity on platforms like TikTok and Instagram for their authentic, artisanal feel, blending creativity with a raw, handmade aesthetic. The beauty of stick and poke lies in its accessibility: anyone with steady hands and the right tools can try it at home. But success hinges on solid ideas tailored for self-application, plus high-quality supplies to ensure safety and longevity. Sterile needles, professional ink, and proper gloves are non-negotiable to prevent infections, fading, or allergic reactions. For a reliable all-in-one starter kit, We recommend our Stick and Poke Tattoo Kit® Basic Kit. It’s beginner-friendly, includes everything you need (needles, ink, gloves, sanitary items, detailed instructions, and much more). Steer clear of cheap kits such as those you’d see on Amazon because they are not high quality, don’t include all the supplies you need, and most include ink that shouldn’t be used on real skin. Don’t take an unnecessary risks.
Why Choose DIY Stick and Poke?
Before jumping into ideas, let’s cover the basics. Stick and poke (also called hand poke) uses a sterile needle attached to a stick or gripped by hand, dipped in ink, and tapped into the skin manually. Unlike machine tattoos, it produces a dotted texture that gives each piece a unique, organic character. Think subtle imperfections that add personality rather than detract from it. It’s slower (a small design might take 1-2 hours), but that’s part of the appeal: it’s meditative, like knitting or drawing, allowing you to connect deeply with your creation.
DIY stick and poke is ideal for those who want full creative control, lower costs (the practice kit starts around $35), and the thrill of self-expression without appointments. It’s also surprisingly social. Many people turn it into a group activity with friends or partners. Imagine a chill evening where everyone sketches ideas, practices on fake skin, and takes turns poking simple designs on each other (with consent and safety protocols, of course). It’s a bonding experience, like hosting a DIY craft night but with permanent(ish) results. Just ensure everyone uses fresh needles and follows hygiene rules to keep things safe.
Step 1: Brainstorming Ideas for Self-Poking
Generating DIY stick and poke ideas starts with introspection, while adapting for the medium’s limitations: one-handed precision means favoring bold lines over fine details (tip: use a mirror or phone camera for hard-to-reach areas like the back of your arm). Begin by listing inspirations in a notebook, phone app, or voice memo: a memorable trip, a book quote, a pet’s quirky habit, or a cultural symbol that resonates.
- Build a visual library: Create a mood board on Pinterest, Instagram, or free tools like Canva. Collect photos of nature, abstract art, or vintage illustrations. For example, combine a mountain silhouette (for adventure) with a tiny tent (for camping memories).
- Theme it out: Categorize ideas by mood: calm (waves, lotuses), bold (daggers, skulls), or playful (emojis, animals). This keeps brainstorming focused.
- Free-write session: Set a 10-15 minute timer and jot every wild concept: “A book with wings for my reading obsession” or “A coffee bean turning into a heart.” No judgment: quantity leads to quality.
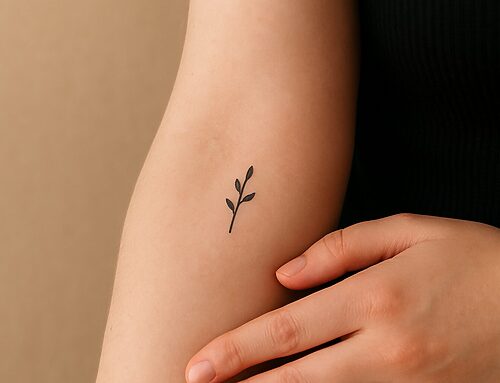
Aim for designs under 3 inches to start; they’re quicker to complete (30-90 minutes) and easier to manage solo. Once you have 10-20 ideas, narrow to 3-5 favorites by considering placement: forearms or calves for visibility and reachability, ribs or thighs for privacy.

Step 2: Placement and Testing Your Design
Location matters as much as the design itself. Choose spots with flatter skin and fewer nerves for less pain: inner forearms, upper thighs, or ankles are DIY favorites. Avoid bony areas like knuckles or spine unless you’re experienced, as they can cause uneven poking.
Test rigorously:
- Sketch and scale: Draw on paper at actual size.
- Skin trial: Use washable markers, henna, or jagua gel for a temporary version. Live with it for a day to check if it vibes with your style.
- Practice run: Poke a sample on fake tattoo skin (silicone sheets available in our practice kit) or even a grapefruit to mimic skin resistance. This builds hand-eye coordination and reveals if the design flows well.
If doing it with friends, swap sketches and practice on each other. It’s a fun way to collaborate and get feedback.
Exploring DIY Hand Poke Styles
DIY stick and poke shines in forgiving styles that embrace the dotted texture from manual tapping. Small designs (1-3 inches) dominate because they’re manageable solo and heal cleanly. Here’s a breakdown:
- Minimalist
- Key Features: Clean lines, negative space, tiny icons
- Best For DIY Because: Simple outlines are easy to steady
- Common Designs: Hearts, arrows, stars, geometric shapes
- Dotwork
- Key Features: Stippling for shading and texture
- Best For DIY Because: Extra dots blend into the design if hand slips
- Common Designs: Mandalas, florals, waves, animal outlines
- Traditional
- Key Features: Bold black outlines, classic motifs
- Best For DIY Because: Forgiving bold lines hide minor wobbles
- Common Designs: Anchors, roses, swallows, daggers
- Illustrative
- Key Features: Doodle-style with narrative elements
- Best For DIY Because: Playful and personal; small scale keeps it doable
- Common Designs: Cartoon pets, moons, quotes, zodiacs
Common themes in DIY? Universals like nature (leaves, suns, mountains for grounding), resilience (semicolons for mental health, infinity loops for eternity), and whimsy (birth flowers, fave foods stylized as symbols). These motifs are popular because they’re meaningful yet simple: no photorealism required.
Step 3: Tools, Safety, and Group Sessions
High-quality supplies are your foundation: cheap alternatives lead to blurred lines, ink migration, or health risks. Essentials include:
- Needles: Single-use sterile (3RL for lines, 5RL for shading).
- Ink: Professional vegan formulas.
- Other: Nitrile gloves, green soap for prep, stencil paper, aftercare balm.
The Stick and Poke Tattoo Kit® Basic Kit bundles all this safely: needles, ink, and guides for hassle-free starts. If you’d like to practice more before your first poke on yourself, you can purchase our practice kit which includes a practice skin and an instructional poster.
For group poking sessions:
- Assign roles: One person pokes while another holds a light or stretches skin.
- Safety pact: Fresh needles per person, shared aftercare knowledge.
- Fun twist: Theme it (e.g., “matching minimalist symbols”) for cohesion.
Always: Work in a sanitized space, wash hands/tools, and monitor for issues. Aftercare: Clean with fragrance-free soap, moisturize 2-3x daily, avoid sun/pools for 2 weeks. Redness is normal; pus or fever means see a doctor.
Overcoming Common Challenges
Newbies often worry about pain (mild sting, like repetitive bee pricks: numb with ice if needed) or crooked lines. Start with the thickest skin parts, take breaks, and breathe steadily. If a dot goes awry, incorporate it dotwork-style. Over time, practice turns shaky hands steady.
Final Thoughts
DIY stick and poke tattoos are a canvas for self-expression, solo or with friends, offering meditative creativity and permanent mementos. Brainstorm meaningfully, test thoroughly, choose simple styles like minimalist or dotwork, and equip with quality like the Stick and Poke Tattoo Kit® Basic Kit. Start small, prioritize safety, and enjoy the process. Your skin, your story: make it count. Don’t forget to poke safely!